Coding Challenge: Interview - > Shorten Url

URL shortening involves generating abbreviated versions of long URLs, referred to as "short links." When users access these short links, they are automatically redirected to the original, longer URL. Short links offer various benefits, such as saving space in display, print, messages, or tweets. Furthermore, shorter URLs decrease the likelihood of users making typing errors.

import java.util.*
 
class URLShortener {
    private val idToUrlMap = HashMap<String, String>()
    private val urlToIdMap = HashMap<String, String>()
    private val BASE_URL = "http://short.url/"
    private val ALPHABET = "abcdefghijklmnopqrstuvwxyzABCDEFGHIJKLMNOPQRSTUVWXYZ0123456789"
 
    fun shortenURL(longURL: String): String {
        if (urlToIdMap.containsKey(longURL)) {
            return BASE_URL + urlToIdMap[longURL]
        }
        val id = generateID()
        idToUrlMap[id] = longURL
        urlToIdMap[longURL] = id
        return BASE_URL + id
    }
 
    fun expandURL(shortURL: String): String {
        val id = shortURL.substring(BASE_URL.length)
        return idToUrlMap[id] ?: "URL not found"
    }
 
    private fun generateID(): String {
        val random = Random()
        val sb = StringBuilder()
        repeat(6) {
            sb.append(ALPHABET[random.nextInt(ALPHABET.length)])
        }
        return sb.toString()
    }
}
 
fun main() {
    val urlShortener = URLShortener()
    val longURL = "https://www.example.com"
    val shortURL = urlShortener.shortenURL(longURL)
    println("Shortened URL: $shortURL")
    val expandedURL = urlShortener.expandURL(shortURL)
    println("Expanded URL: $expandedURL")
}
 

Details of above code with explanation

  • idToUrlMap: This HashMap maps shortened IDs (generated by the shortening process) to their corresponding original URLs. It facilitates the expansion process.
  • urlToIdMap: This HashMap maps original URLs to their corresponding shortened IDs. It helps avoid duplication of shortened URLs for the same original URL.
  • BASE_URL: This constant string represents the base URL for the shortened URLs. All shortened URLs generated by this URL shortener will start with this base URL.
  • ALPHABET: This string contains the characters used to generate the random alphanumeric IDs for shortening URLs.
  • shortenURL(longURL: String): This method takes a long URL as input and generates a shortened URL for it. If the long URL has already been shortened before, it retrieves the existing shortened URL. Otherwise, it generates a new shortened ID, maps it to the long URL, and returns the shortened URL.
  • expandURL(shortURL: String): This method takes a shortened URL as input and returns the corresponding original URL. It extracts the ID from the shortened URL and looks it up in the idToUrlMap. If the ID exists in the map, it returns the corresponding original URL; otherwise, it indicates that the URL is not found.
  • generateID(): This private method generates a random alphanumeric ID of length 6 using characters from the ALPHABET string. It ensures uniqueness for each shortened URL.
Happy Coding ✌

Coding Challenge: Interview - > Rotate Image

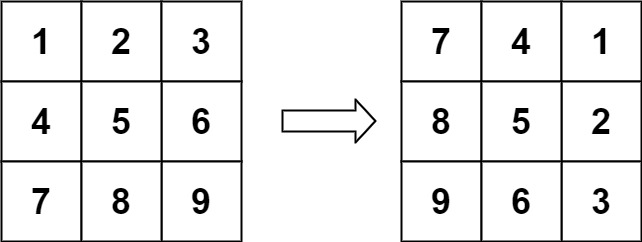
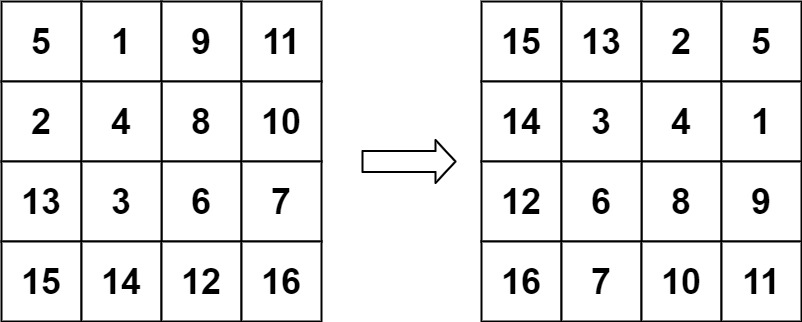
 You are given an n x n 2D matrix representing an image, rotate the image by 90 degrees (clockwise).

You have to rotate the image in-place, which means you have to modify the input 2D matrix directly. DO NOT allocate another 2D matrix and do the rotation.

 Example 1:

Input: matrix = [[1,2,3],[4,5,6],[7,8,9]]
Output: [[7,4,1],[8,5,2],[9,6,3]]

Example 2:

Input: matrix = [[5,1,9,11],[2,4,8,10],[13,3,6,7],[15,14,12,16]]
Output: [[15,13,2,5],[14,3,4,1],[12,6,8,9],[16,7,10,11]]


Constraints:

  • n == matrix.length == matrix[i].length
  • 1 <= n <= 20
  • -1000 <= matrix[i][j] <= 1000

Solutions:

fun rotate(matrix: Array<IntArray>) {
    val n = matrix.size
    
    // Transpose the matrix
    for (i in 0 until n) {
        for (j in i until n) {
            val temp = matrix[i][j]
            matrix[i][j] = matrix[j][i]
            matrix[j][i] = temp
        }
    }
    
    // Reverse each row
    for (i in 0 until n) {
        var left = 0
        var right = n - 1
        while (left < right) {
            val temp = matrix[i][left]
            matrix[i][left] = matrix[i][right]
            matrix[i][right] = temp
            left++
            right--
        }
    }
}


Here is the more details of each details

Certainly! Let's break down the solution step by step:

  1. Transpose the matrix:

    • To transpose the matrix means to swap its rows and columns. We iterate over the upper triangle of the matrix (i.e., i from 0 to n-1, j from i to n-1) and swap each element with its corresponding element across the diagonal.
    • For example, if we have a matrix [[1, 2, 3], [4, 5, 6], [7, 8, 9]], transposing it will give us [[1, 4, 7], [2, 5, 8], [3, 6, 9]].
  2. Reverse each row:

    • After transposing the matrix, we iterate over each row, and for each row, we reverse its elements.
    • This reversal effectively rotates each row by 180 degrees.
    • For example, if we have a transposed matrix [[1, 4, 7], [2, 5, 8], [3, 6, 9]], reversing each row will give us [[7, 4, 1], [8, 5, 2], [9, 6, 3]].

By performing these two operations, we achieve the desired result of rotating the matrix by 90 degrees clockwise. The key insight is that transposing the matrix swaps rows and columns, effectively rotating it by 90 degrees counterclockwise. Then, reversing each row completes the rotation to 90 degrees clockwise. This solution modifies the input matrix in-place without using any extra space.


Happy Coding ✌!

Jetpack Compose: How to use of Row and Column

  Jetpack Compose is a modern toolkit for building native Android UI. Jetpack Compose simplifies and accelerates UI development on Android with less code, powerful tools, and intuitive Kotlin APIs.

You won't be editing any XML layouts or using the Layout Editor. Instead, you will call composable functions to define what elements you want, and the Compose compiler will do the rest. 


Use Column to place items vertically on the screen.

use Row to place items horizontally on the screen. Both Column and Row support configuring the alignment of the elements they contain.

In many cases, you can just use Compose's standard layout elements.

Here is the sample code ✌:

class MainActivity : ComponentActivity() {
override fun onCreate(savedInstanceState: Bundle?) {
super.onCreate(savedInstanceState)
setContent {
JetpackComoseTutorialsTheme {
// A surface container using the 'background' color from the theme
ActorCard(Actor("John Wick", "Actor", 49))
}
}
}
}

data class Actor(val name:String, val profession: String, val age: Int)

@Composable
fun ActorCard(actor: Actor) {
Card(modifier = Modifier.fillMaxWidth().padding(all = 4.dp)) {
Row(modifier = Modifier.padding(all = 8.dp)) {
Image(
painter = painterResource(R.drawable.profile),
contentDescription = null,
modifier = Modifier
.size(40.dp)
.clip(CircleShape)
.border(2.dp, MaterialTheme.colorScheme.primary, CircleShape),
alignment = Alignment.BottomCenter
)

Spacer(modifier = Modifier.width(4.dp))

Column {
Row {
Text(
text = actor.name,
style = MaterialTheme.typography.titleMedium,
color = MaterialTheme.colorScheme.secondary
)
Text(
text = ", "+actor.age.toString(),
style = MaterialTheme.typography.titleMedium,
color = MaterialTheme.colorScheme.secondary
)
}

Spacer(modifier = Modifier.height(4.dp))
Text(text = actor.profession)
}
}
}
}class MainActivity : ComponentActivity() {
override fun onCreate(savedInstanceState: Bundle?) {
super.onCreate(savedInstanceState)
setContent {
JetpackComoseTutorialsTheme {
// A surface container using the 'background' color from the theme
ActorCard(Actor("John Wick", "Actor", 49))
}
}
}
}

data class Actor(val name:String, val profession: String, val age: Int)

@Composable
fun ActorCard(actor: Actor) {
Card(modifier = Modifier.fillMaxWidth().padding(all = 4.dp)) {
Row(modifier = Modifier.padding(all = 8.dp)) {
Image(
painter = painterResource(R.drawable.profile),
contentDescription = null,
modifier = Modifier
.size(40.dp)
.clip(CircleShape)
.border(2.dp, MaterialTheme.colorScheme.primary, CircleShape),
alignment = Alignment.BottomCenter
)

Spacer(modifier = Modifier.width(4.dp))

Column {
Row {
Text(
text = actor.name,
style = MaterialTheme.typography.titleMedium,
color = MaterialTheme.colorScheme.secondary
)
Text(
text = ", "+actor.age.toString(),
style = MaterialTheme.typography.titleMedium,
color = MaterialTheme.colorScheme.secondary
)
}

Spacer(modifier = Modifier.height(4.dp))
Text(text = actor.profession)
}
}
}
}


Sample output :


Happy Coding ✌.

Android 15 Developer Preview


Developer Preview 1 is now available to try out with your apps. Install a system image and update the tools to get started. During this phase, we're looking for your feedback, so please let us know what you think! To report an issue or submit a feature request, visit the feedback page. The earlier we get your feedback, the more we can include in the final release.
Release dateFebruary 16, 2024
BuildAP31.240119.016
Emulator supportx86 (64-bit), ARM (v8-A)
Security patch levelFebruary 2024
Google Play services24.02.15
API diffAPI 34 → V DP1


Protecting user privacy and security

Android is constantly working to create solutions that maximize user privacy and security.

Privacy Sandbox on Android

Health Connect

File integrity

Partial screen sharing

Supporting creators

In-app Camera Controls

Virtual MIDI 2.0 Devices

Performance and quality

Dynamic Performance

Android 15 continues our investment in the Android Dynamic Performance Framework (ADPF), a set of APIs that allow games and performance intensive apps to interact more directly with power and thermal systems of Android devices. On supported devices, Android 15 will add new ADPF capabilities:

    • power-efficiency mode for hint sessions to indicate that their associated threads should prefer power saving over performance, great for long-running background workloads.
    • GPU and CPU work durations can both be reported in hint sessions, allowing the system to adjust CPU and GPU frequencies together to best meet workload demands.

To learn more about how to use ADPF in your apps and games, head over to the documentation.

Developer Productivity

Android 15 continues to add OpenJDK APIs, including quality-of-life improvements around NIO buffersstreamssecurity, and more. These APIs are updated on over a billion devices running Android 12+ through Google Play System updates.

You can install this release on any of the following Google Pixel devices:

  • Pixel 6 and 6 Pro
  • Pixel 6a
  • Pixel 7 and 7 Pro
  • Pixel 7a
  • Pixel Fold
  • Pixel Tablet
  • Pixel 8 and 8 Pro

See Get Android 15 for details on how to get started.