Showing posts with label Android Errors. Show all posts

Unsupported metadata version. Check that your Kotlin version is >= 1.0

The error "Unsupported metadata version. Check that your Kotlin version is >= 1.0" arises when there is a mismatch between the Kotlin metadata version of a library or compiled code and the Kotlin compiler or runtime being used in your project. This is often due to one or more of the following reasons:


1. Kotlin Plugin Version Mismatch

  • Cause: The Kotlin version declared in your build.gradle file does not match the version of the Kotlin Gradle plugin or the libraries you're using.
  • Fix: Ensure your build.gradle files have consistent and up-to-date Kotlin versions.
    • In the project-level build.gradle file, ensure the Kotlin Gradle plugin matches the latest version:
      dependencies {
          classpath "org.jetbrains.kotlin:kotlin-gradle-plugin:1.9.0" // Use the latest version
      }
    • In the app-level build.gradle or build.gradle.kts:
      implementation "org.jetbrains.kotlin:kotlin-stdlib:1.9.0" // Same as plugin version

2. Outdated Kotlin Plugin in Android Studio

  • Cause: Android Studio may have an older version of the Kotlin plugin installed, leading to incompatibility with newer Kotlin libraries.
  • Fix:
    • Go to File > Settings > Plugins > Kotlin (or on macOS, Android Studio > Preferences > Plugins > Kotlin).
    • Update the Kotlin plugin to the latest version compatible with your project.

3. Using Libraries Built with a Newer Kotlin Version

  • Cause: A third-party library or dependency in your project may have been compiled with a newer Kotlin version than what your project uses.
  • Fix:
    1. Identify the problematic library:
      • Check your build.gradle file and dependencies block.
      • Look for warnings in the build log about incompatible metadata versions.
    2. Update the library to the latest version compatible with your Kotlin version.
    3. If updating is not possible, align your Kotlin version with the library's metadata version.

4. Metadata Version Compatibility

  • Cause: Kotlin compiler outputs metadata that specifies the Kotlin version used. If a library’s metadata version is newer than your compiler's supported version, this error occurs.
  • Fix: Update your Kotlin version in the build.gradle file to match or exceed the version used by the library. Use the latest stable Kotlin version to ensure compatibility.

5. Corrupted Gradle Cache

  • Cause: A corrupted Gradle cache might cause metadata mismatch errors.
  • Fix:
    • Invalidate and restart:
      • Go to File > Invalidate Caches / Restart > Invalidate and Restart.
    • Clear the Gradle cache manually:
      • Delete the .gradle folder in your user directory or the project directory.

6. Dependency Conflicts

  • Cause: Conflicting versions of Kotlin dependencies or libraries in your project.
  • Fix:
    1. Run Gradle's dependency resolution report:
      ./gradlew dependencies
    2. Look for duplicate versions of Kotlin libraries or conflicting dependencies.
    3. Resolve conflicts by forcing consistent versions in your build.gradle file:
      configurations.all {
          resolutionStrategy {
              force 'org.jetbrains.kotlin:kotlin-stdlib:1.9.0'
          }
      }

7. Build Configuration Issues

  • Cause: The Gradle wrapper version or build tools version may not support the Kotlin version.
  • Fix:
    • Ensure the Gradle wrapper is updated:
      ./gradlew wrapper --gradle-version <latest-supported-version>
      Example:
      ./gradlew wrapper --gradle-version 8.1
    • Update the Android Gradle plugin version in the build.gradle file:
      dependencies {
          classpath 'com.android.tools.build:gradle:8.0.0'
      }

Debugging Tips

  1. Enable Detailed Logging: Run the build with --info or --debug to get more information:
    ./gradlew build --info
  2. Inspect Build Logs: Look for stack traces or specific metadata version mismatches to identify problematic libraries.

By ensuring consistency across Kotlin versions, plugins, libraries, and tools, this issue can be resolved. If you still face challenges, share the relevant sections of your build.gradle file or build logs for more precise guidance. In summary, the "Unsupported metadata version" error arises from version mismatches in Kotlin dependencies, tools, or plugins. To resolve it, ensure consistent Kotlin versions across your project, update plugins, Gradle, and libraries, and clean/rebuild the project. By maintaining compatibility and aligning versions, you can prevent and fix this issue, ensuring smooth Kotlin development.

appcompat-v7:21.0.0': No resource found that matches the given name: attr 'android:actionModeShareDrawable' in Android

If you faced appcompat-v7:21.0.0': No resource found that matches the given name: attr 'android:actionModeShareDrawable' error on during developing android application.

Here is the solution in Android studio, Eclipse and  IntelliJ IDEA.

Prerequirements
Make sure that you've downloaded the latest extras as well as the Android 5.0 SDK via the SDK-Manager.
Picture of the SDK Manager


Android Studio:

Open the build.gradle file of your app-module and change your compileSdkVersion to 21. It's basically not necessary to change the targetSdkVersion SDK-Version to 21 but it's recommended since you should always target the latest android Build-Version.
In the end you gradle-file will look like this:
android {
    compileSdkVersion 21
    // ...

    defaultConfig {
        // ...
        targetSdkVersion 21
    }
}
Be sure to sync your project afterwards.
Android Studio Gradle Sync reminder


Eclipse:

The only thing you have to do is to open the project.properties file of the android-support-v7-appcompat and change the target from target=android-19 to target=android-21.
Afterwards just do a Project --> Clean... so that the changes take effect.


IntelliJ IDEA:

Right click on appcompat module --> Open Module Settings (F4) --> [Dependency Tab] Select Android API 21 Platform from the dropdown --> Apply
Select API 21 Platform
Then just rebuild the project (Build --> Rebuild Project) and you're good to go.

Sometimes , If above solution doesnot work then try this
Haven't set compileSdkVersion to 21 in your build.gradle file and change targetSdkVersion to 21.
android {
    //...
    compileSdkVersion 21

    defaultConfig {
        targetSdkVersion 21
    }
    //...
}
This requires you to have downloaded the latest SDK updates to begin with.
Android Studio SDK Manager
Once  downloaded all the updates (don't forget to also update the Android Support Library/Repository, too!) and updated your compileSdkVersion, re-sync Gradle project.
Edit: For Eclipse or general IntelliJ users


Happy Coding!!!

ERROR: In MenuView, unable to find attribute android:preserveIconSpacing in Android

Are you struggling with ERROR: In <declare-styleable> MenuView, unable to find attribute android:preserveIconSpacing in Android using eclipse , this error comes in R.Java files, you clearly see on you project, then don't worry , we have solution for this error.

Steps:
1. Right Click on Project
2. Go to Properties
3. Choose Android
4. Change Below API version then previous(eg. if 5.1.1 then 4.1.2 or other below 5.1.1)
5.and finally clean the project.

However, if above solution did not solve your problem, try next method,
This error comes sometimes because you are using an old Appcompat version .. update Appcompat, to the newer version which is compatible with API 22, then click on fix project properties .

Happy Coding !!!

Error parsing data org.json.JSONException: Expected ':' after n in Android or Android Studio

Last time, i got error when trying to parse a JSONObject , then i have found simple mistake during parsing.

It's because i append an "n" at the end of each line here:

        while((line = reader.readLine()) != null) {
            sb.append(line + "n");
        }

then I change to a newline character "\n":

    while((line = reader.readLine()) != null) {
        sb.append(line + "\n");
    }

finally, I solve the problem, hope this may helpful.

Happy Coding !!!

No resource found that matches the given name after upgrading to AppCompat v23 in android studio

I have stocked in many times of by taking this No resource found that matches the given name after upgrading to AppCompat v23 in android studio. So, here i have decided to post, it solution for everyone, which is helpful who faced such kind of problem in android studio.

Solution:

Your compile SDK version must match the support library's major version.
Since you are using version 23 of the support library, you need to compile against version 23 of the Android SDK.
Alternatively you can continue compiling against version 22 of the Android SDK by switching to the latest support library v22. (solution from stackoverflow)

Sometime, if not working above solution  please try this,

replace:
          compile 'com.google.android.gms:play-services:+'
to:
          compile 'com.google.android.gms:play-services:8.3.0'

and vice versa.

Then you can continue full targeting API 22

If it still doesn't compile, sometimes is useful to set compileSdkVersion API to 23 and targetSdkVersion to 22.

How to declare global variables in Android?


Sometimes you have need define or declare most of the variable globally access, in such senario you have define or declare global variable like this which is simple, sooniln define on stackoverflow very simple way:

class MyApp extends Application {

  private String myState;

  public String getState(){
    return myState;
  }
  public void setState(String s){
    myState = s;
  }
}

Now to you have to access above defined variable before you have setStatus.

class Blah extends Activity {

  @Override
  public void onCreate(Bundle b){
    ...
    MyApp appState = ((MyApp)getApplicationContext());
    String state = appState.getState();
    ...
  }
}


Happy Coding!!!


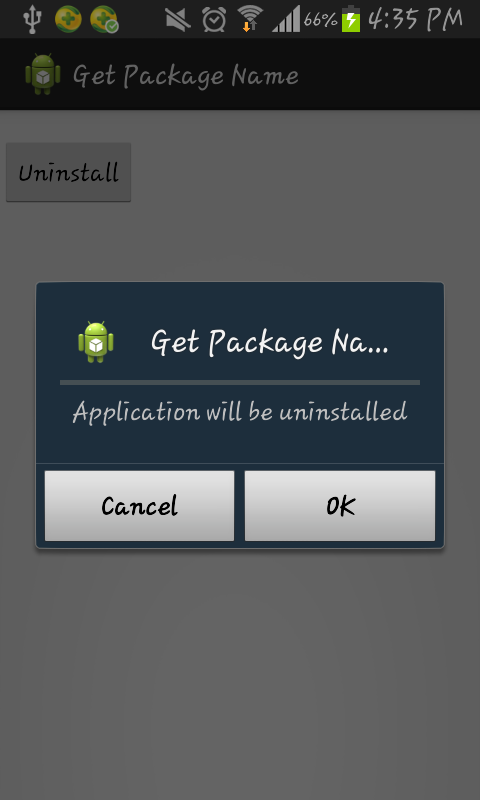
Uninstall app from android code

Are you want to uninstall app from you code, here is the snap code.

package com.example.packageName;

public class UninstallApp extends Activity {


private Button btn;
@Override
protected void onCreate(Bundle savedInstanceState) {
super.onCreate(savedInstanceState);
setContentView(R.layout.activity_main);

btn=(Button) findViewById(R.id.btn_next);
btn.setOnClickListener(new View.OnClickListener() {

@Override
public void onClick(View v) {

Intent intent = new Intent(Intent.ACTION_DELETE);
or 
///Intent intent = new Intent(Intent.ACTION_UNINSTALL_PACKAGE);
intent.setData(Uri.parse("package:com.example.packageName"));
startActivity(intent);

}
});

Here is the snapshots of this app:


 Click Ok for uninstall app and Cancel for cancel dialog box.

Happy Coding!!!

Problem and Solution: Background ListView becomes black when scrolling after populated data on list


I have faced background ListView becomes black when scrolling after populated data on list, after that i have  found easy solution from stackoverflow.


Add an attribute on the ListView Tag

android:cacheColorHint="#00000000"

More details about this problem, go to android blog: http://android-developers.blogspot.com/2009/01/why-is-my-list-black-android.html

or alternate solutions , may be if the above trick not working then try this:

It's very simple just use this line in your layout file :

android:scrollingCache="false"
l
ike this:

<ListView 
android:layout_width="fill_parent"
android:layout_height="fill_parent"
android:scrollingCache="false"
/>

finally, both of the above not working try this also:

list.setCacheColorHint(Color.TRANSPARENT);
list.requestFocus(0);


if all the above not working then please visit:  http://developer.android.com/reference/java/util/List.html
and
http://developer.android.com/guide/topics/ui/layout/listview.html

Happy Coding!!!

Disable landscape mode for some of the views in my Android app


The screen orientation has changed — the user has rotated the device.

Note: If your application targets API level 13 or higher (as declared by the minSdkVersion and targetSdkVersion attributes), then you should also declare the "screenSize"configuration, because it also changes when a device switches between portrait and landscape orientations.     More

You can just put on your activity on manifest file:

             <activity android:name=".MainActivity"
              android:label="@string/app_name"
              android:screenOrientation="portrait">


If you still need to force portrait for some reason, sensorPortrait may be better than portrait for Android 2.3+; this allows for upside-down portrait, which is quite common in tablet usage.

Go to this link may be h elpful: http://code.google.com/android/reference/android/R.styleable.html#AndroidManife‌​stActivity_screenOrientation

Happy Coding!!!

Common Errors while Developing Android Application


  • NullPointer error
    1. when i use un initialized variable or object we are creating. (Java)
    2. when we use some layout out view that is not in xml what we set in context.(Android)

  • ClassCast Exception
    • when a program attempts to cast a an object to a type with which it is not compatible. (eg: when i try to use a linear layout which is declared as a relative layout in xml layout).

  • StackOverflowError
    • it can also occur in correctly written (but deeply recursive) programs.(java and android)
    • when a program becomes infinitely recursive.
    • we create layout (deep and complex) that exceeds that stack of platform or virtual machine . recursive or too much of layout will create Stack overflow error in Android
    • Too many inner layouts.

  • ActivityNotFoundException: Unable to find explicit activity class exception
    • The activity is not declared in manifest.

  • Android securityException
    • You need to declare all permission in the application Manifest that your application check this link (internet, access to contact,gps,wifi state,write to SDCard, etc).

  • OutofMemoryError
    • when a request for memory is made that can not be satisfied using the available platform resources . mainly using bit map, gallery , etc.

  • Application Not Responding (ANR)
    • Mainly comes when you are making network function,or some long process.
    this will block UI Thread so user can not do any work. to avoid ANR read this & this
This are thing i mainly get while creating Android Project.
  • Try to use Try - Catch block in All Place of program. Dont leave your catch block empty as this can hide errors:
Yes:
 try{
// try something
} catch (Exception e) {
Log.e("TAG", "Exception in try catch", e);
return false;
}
return true;
No:
  try{
// try something
} catch (Exception e) {
return false;
}
return true;

Use proper Naming conversion for all variable and ID's in Layout.*

 one article from net it contains some error now i am adding that alos if it have redundancy please forgive me.

Issue : My previously nice RelativeLayout is making an ugly heap or some elements aren't visible anymore...What's going on ??? I just moved an element in it... Solution : Never forget that in a RelativeLayout, elements are referenced and placed in relation to their neighbours. Maybe there is something wrong in the hierarchy of relationship between your element. Try opening the outline view in Eclipse and clicking each element to see where there is a rupture.

Issue : Circular dependencies cannot exist in RelativeLayout Solution : You have probably written the same dependency in two different way. For instance an ImageView as the attribute android:layout_toRightOf a TextView and the TextView has android:layout_toLeftOf the ImageView. Only one of them is necessary
Issue : I wrote a style for one of my view/layout, but when I apply it in my xml, I have no display in the layout viewer of Eclipse Solution : Unfortunately, this seems to be a bug of the android ADT, I reported it but no news so far. Anyway, no panic, styles are working well, but they aren't displayed properly in Eclipse. Just build the app and launch it on the emulator or phone and you will see if everything is fine or not.

Issue : Toast is written properly but nothing is displayed Solution : This is a common error of use : just add the .show() method to show the Toast and see if it is working well

Issue : I tried to display a String from strings.xml but I just had a number like 0x7f060001 Solution : This is not a bug, just a display due to the way android deals with resources. When you want to retrieve a resource, you have to use a method like getString(R.id.something), getDrawable, …Otherwise, you just display the reference written in the R class

Issue : Some change in code doesn't have any effect in the application Solution : there are 2 options, either you have forgotten something like the .show() of the Toast, or the emulator is not updating properly your application. In that case, you have to check the option “Wipe user Data” in your launch configuration of the emulator in Eclipse.

Issue : How to display borders on my table? Solution : There is no direct way to do that in android, you have to use a trick :http://www.droidnova.com/display-borders-in-tablelayout,112.html

Issue : the emulator is writing in japaneese withtout you having changed any parameter Solution : This happens sometimes, quite easy to fix, just long click in any EditText field, and change the input type to what you want

Issue : I can't get the Context Menu to appear in the emulator Solution : long click on emulator does not seem to register on every kind of view, you have to push the button in the center of the 4 directionnal arrows

Issue : I'm following a tutorial about map route but I can't get it work, android does not find a package Solution : You might have been following a tutorial written for 1.5 SDK. At this time, there was a package to display route in android, but it was removed in the next SDK and is not available anymore. It just not possible anymore. There seems to be a trick with KML files but nothing official

Issue : Sending coordinates to the emulator gives wrong position Solution : ensure that you wrote the coordinate like 51.16548 and not 51,16548 nor 5116548

Issue : Only the original thread that created a view hierarchy can touch its views. Solution : You must have tried to update a view content from another thread than the UI thread. 2 options to patch this : either create a handler in your UI thread and post your Runnable to this handler OR use the method runOnUIThread to run the lines of code that are doing the update


Issue : accessing localhost 127.0.0.1 doesn't work Solution : it works, you are just not doing it the right way : use 10.0.2.2

Source

Happy Coding!!!

R cannot be resolved to a variable in Android


First you may clean the project, then run the project. If this does not work then follow the following links:


  • Make sure that anything the R. links to is not broken. Fix all errors in your XML files. If anything in the ADKs are broken, R will not regenerate.
  • If you somehow hit something and created import android.R in your activity, remove it.
  • Run Project -> Clean. This will delete and regenerate R and BuildConfig.
  • Make sure Project -> Build Automatically is ticked. If not, build it manually via Menu -> Project -> Build Project .
  • Wait a few seconds for the errors to disappear.
  • If it doesn't work, delete everything inside the /gen/ folder
  • If it still doesn't work, try right-clicking your project -> Android Tools -> Fix Project Properties.
  • Check your *.properties files (in the root folder of your app folder) and make sure that the links in there are not broken.
  • Right-click your project > properties > Android. Look at the Project Build Target and Library sections on the right side of the page. Your Build Target should match the target in your AndroidManifest.xml. So if it's set to target 17 in AndroidManifest, make sure that the Target Name is Android 4.2. If your Library has an X under the reference, remove and re-add the library until there's a green tick. This might happen if you've moved a few files and folders around -  Source
  • Load an ImageView by URL in Android


    Image referenced by URL in an ImageView, getting image from url and set on imageview, then here is the some idea, which may helpful .

    Here is the some snap codes:

    // show The Image on button load click event
    new DownloadImageTask((ImageView) findViewById(R.id.imageView1))
                .execute("http://java.sogeti.nl/JavaBlog/wp-content/uploads/2009/04/android_icon_256.png");
    }

    public void onClick(View v) {
        startActivity(new Intent(this, IndexActivity.class));
        finish();

    }

    private class DownloadImageTask extends AsyncTask<String, Void, Bitmap> {
        ImageView bmImage;

        public DownloadImageTask(ImageView bmImage) {
            this.bmImage = bmImage;
        }

        protected Bitmap doInBackground(String... urls) {
            String urldisplay = urls[0];
            Bitmap mIcon11 = null;
            try {
                InputStream in = new java.net.URL(urldisplay).openStream();
                mIcon11 = BitmapFactory.decodeStream(in);
            } catch (Exception e) {
                Log.e("Error", e.getMessage());
                e.printStackTrace();
            }
            return mIcon11;
        }

        protected void onPostExecute(Bitmap result) {
            bmImage.setImageBitmap(result);
        }
    }
    write permission on  AndroidManifest.xml to access the internet.

    <uses-permission android:name="android.permission.INTERNET" />

     and convert whole ImageView to Bitmap from this code:

    imageView.buildDrawingCache();
    Bitmap bmap = imageView.getDrawingCache();

    other examples:

    http://www.learn2crack.com/2014/06/android-load-image-from-internet.html

    http://www.androidhive.info/2012/07/android-loading-image-from-url-http/

    http://theopentutorials.com/tutorials/android/imageview/android-how-to-load-image-from-url-in-imageview/

    http://belencruz.com/2012/11/load-imageview-from-url-in-android/

    Happy Coding!!!

    Android error: Failed to install *.apk on device *: timeout


    Do most important this, when your faced this problem, lets hope you have to through away this problem.

    Try changing the ADB connection timeout. I think it defaults that to 5000ms and I changed mine to 10000ms to get rid of that problem.
    If you are in Eclipse, you can do this by going through

    Window-> Preferences -> Android -> DDMS -> ADB Connection Timeout (ms)

    Sometime, it works by doing this also:
    don't use USB 3.0 ports for connection beetwen PC and Android phone!
    USB 3.0 - Port with blue tongue
    USB 2.0 - Port with black tongue

    Happy coding!!!

    Jar Mismatch Found 2 versions of android-support-v4.jar in the dependency list


    Step #1: Undo all that. If you are messing with the build path, on R16 or higher version of the ADT plugin for Eclipse, you're doing it wrong.
    Step #2: Pick one of those two versions of the JAR, or pick the one from the "extras" area of your SDK installation.
    Step #3: Put the right JAR in App Library.
    Step #4: Delete the one from App Free, since it will pick up that JAR from App Library.
    You are welcome to instead have the same actual JAR file in both spots (App Free and App Library), though that just takes up extra space for no reason.
    This wrote CommonsWare.
    may work some time for this:
    Delete android-support-v4.jar from library and project. Then go in <sdk>/extras/android/support/samples/Support4Demos/ and copy android-support-v4.jarand paste in libs folder of both.

    and finally all of not working, then try this:
    1. Delete android-support-v4.jar from App Free
    2. Add the same file from App Library to App Free

    Problem: Android : CalledFromWrongThreadException;: Only the original thread that created a view hierarchy can touch its views

    Avoid performing long-running operations (such as network I/O) directly in the UI thread — the main thread of an application where the UI is run — or your application may be blocked and become unresponsive. Here is a brief summary of the recommended approach for handling expensive operations:
    1. Create a Handler object in your UI thread
    2. Spawn off worker threads to perform any required expensive operations
    3. Post results from a worker thread back to the UI thread's handler either through a Runnable or a Message
    4. Update the views on the UI thread as needed

    AsyncTask enables proper and easy use of the UI thread. This class allows to perform background operations and publish results on the UI thread without having to manipulate threads and/or handlers.

    So Here is the best solutions:

    ou have to move the portion of the background task that updates the ui onto the main thread. There is a simple piece of code for this:
    runOnUiThread(new Runnable() {
    @Override
    public void run() {

    //stuff that updates ui

    }
    });

    Documentation for Activity.runOnUiThread.


    or you may use this:

    Basically you would wrap //do whatever you wantin a Runnable and invoke it with a Handler instance.

    Handler refresh = new Handler(Looper.getMainLooper());
    refresh
    .post(new Runnable() {
    public void run()
    {
    //do whatever you want

    }
    });

    or simple do that:

    you don't call directly the onProgressUpdate, you have to call publishProgress and let the AsynTask framework to handle the onProgressUpdate to be called back on the UI thread.


    Finally, google it : Here is the best solutions that reach there. Gooogled


    Happy Coding!!!

    Eclipse - Failed to create the java virtual machine

    Mostly eclipse user developer stick this error sometimes or many times during on his developing careers. So lets find out some solution, how to fix "failed to create the java virtual machine".

    I have found some fine solution in stackoverflow and borrowing some answers here.

    Solutions 1
    ------------
    1. Open the eclipse.ini file from your eclipse folder,see the picture below.
    eclipse.ini
    2. Open eclipse.ini in Notepad or any other text-editor application, Find the line -Xmx256m (or -Xmx1024m). Now change the default value 256m (or 1024m) to 512m. You also need to give the exact java installed version (1.6 or 1.7 or other).
    max size
    Like This:
    -Xmx512m
    -Dosgi.requiredJavaVersion=1.6
    OR
    -Xmx512m
    -Dosgi.requiredJavaVersion=1.7
    Then it works .

    Solutions 2.
    -----------

    if solutions 1 is not working then try this:
    Try removing the -vm P:\Programs\jdk1.6\bin lines.

    Also, a general recommendation: set -Dosgi.requiredJavaVersion=1.6, not 1.5.

    Solution 3
    --------------
    There are two place in eclipse.ini that includes
    --launcher.XXMaxPermSize
    256m
    make it
    --launcher.XXMaxPermSize
    128m

    Solution 4.
    -------------------
    if all the above solutions is not working then, try this:

    Try to add


    -vm D:\Java\jdk1.6.0_29\bin\javaw.exe
    FYI: Refer sunblog
    Source:http://stackoverflow.com/questions/7302604/eclipse-error-failed-to-create-the-java-virtual-machine
    HappY CodinG

    If WiFi state is not enabling ? How to enable.

    If your application wifi state not enable please do something fro enabling the wifi state. this answers taken from stackoverflow.

    First you need to declare the following in your manifest file

    <uses-permission android:name="android.permission.ACCESS_WIFI_STATE"></uses-permission>
    <uses-permission android:name="android.permission.UPDATE_DEVICE_STATS"></uses-permission>
    <uses-permission android:name="android.permission.CHANGE_WIFI_STATE"></uses-permission>
    <uses-permission android:name="android.permission.WAKE_LOCK"></uses-permission>

    After doing it that on your Activity class

    private WifiManager wifiManager;
    @Override
    public void onCreate(Bundle icicle) {
    ....................
    wifiManager
    = (WifiManager) this.getSystemService(Context.WIFI_SERVICE);
    if(wifiManager.isWifiEnabled()){
    wifiManager
    .setWifiEnabled(false);
    }else{
    wifiManager
    .setWifiEnabled(true);
    }
    }

    Explanation
    Get the Wifi service from our system
    wifiManager = (WifiManager) this.getSystemService(Context.WIFI_SERVICE);
    Check the our wifi is currently turned on or turned off
    if(wifiManager.isWifiEnabled()){
    Turn on/off our wifi wifiManager.setWifiEnabled();


    Reference
    WifiEnabler
    http://google-androidlovers.blogspot.com/2012/01/scan-for-wireless-networks-in-android.html

    http://www.java2s.com/Open-Source/Android/android-platform-apps/Settings/com/android/settings/wifi/WifiApEnabler.java.htm


    Happy Coding !!!

    Temporarily disable orientation changes in an Activity

    I have search on internet and test on my device and emulator. I got solution of how to temporarily disable orientation changes in an Activity. Here is the solution which is get various site, specially Stackoverflow.

    setRequestedOrientation(ActivityInfo.SCREEN_ORIENTATION_NOSENSOR);

    and then

    setRequestedOrientation(ActivityInfo.SCREEN_ORIENTATION_SENSOR);

     it really works

    Go to more:
    http://stackoverflow.com/questions/3821423/background-task-progress-dialog-orientation-change-is-there-any-100-working/3821998#3821998

    http://stackoverflow.com/questions/3611457/android-temporarily-disable-orientation-changes-in-an-activity/3611554#3611554

    Solution: Android INSTALL_FAILED_INSUFFICIENT_STORAGE error.

     Eclipse will sometimes say this:
    [2010-11-20 11:41:57 - My Cool Ass Application] Installation error: INSTALL_FAILED_INSUFFICIENT_STORAGE
    [2010-11-20 11:41:57 - My Cool Ass Application] Please check logcat output for more details.
    [2010-11-20 11:41:57 - My Cool Ass Application] Launch canceled!


    This is cute and utterly annoying. In fact, this has caused me to completely give up on coding boated Android/Java for the day on a few occasions. waiting for the AVD to reboot – sucks. This Google Groups post says to restart the emulator. Yeah, thanks Google. At first I gave the emulator the benefit of the doubt and thought, “hey, my app has an mp3 compiled into it making it rather big (12MB), maybe I should move the mp3 to the SD Card upon installation or put the mp3 somewhere online and stream it to the system. Then I clicked on

    Settings->Applications->Manage Applications and the Android AVD said this:

    You do not have any third party applications installed.
    After hours of research, I figured out that this error means nothing at all. If you reattempt to upload your project (CTRL+F11) it will not solve the non-existent error. This means that you need to either restart the AVD (Android virtual machine you are testing the project on), or sometimes it gets so bad you need to restart the emulator too. If you still get it, you need to delete the AVD and create a new instance:

    Window->Android SDK AVD Manager->Delete->New...

    Sometimes the Error console will say that it just brought the old version to the front screen! This is AFTER you tell the IDE to upload and install a new version. How disrespectful!

    Speed is another thing to consider. I use CTRL+F11 to hurry up and upload the app to the device and run it. If you edit your XML file to say wrap the contents of the LinearLayout tag in ScrollView tags, this causes Eclipse to slow down to a crawl. Not only that, the project will be loaded into the emulator AVD and you will see a nasty red X next time you go back to the XML to view it and not know why it’s there. – Take your time with this gigantic Cthulhuian slow IDE.
    Or 


    >

    You need to increase the Android emulator's memory capacity, there are 2 ways for that:

    1- Right click the root of your Android Project, go to "Run As" then go to "Run Configurations..." locate the "Android Application" node in the tree at the left, then select your project and go to the "Target" tab on the right side of the window look down for the "Additional Emulator Command Line Options" field (sometimes you'll need to make the window larger) and finally paste "-partition-size 1024" there. Click Apply and then Run to use your emulator.

    2- Go to Eclipse's Preferences, then Select “Launch” Add “-partition-size 1024” on the “Default emulator option” field, then click “Apply” and use your emulator as usual.

    Want to see more details about this problem click these links 

    1.   http://stackoverflow.com/questions/6788996/installation-error-install-failed-insufficient-storage-during-runing-emulator
     2.    http://stackoverflow.com/questions/4709137/solution-android-install-failed-insufficient-storage-error
    3.      http://stackoverflow.com/questions/5359766/i-have-enough-memory-but-am-getting-the-install-failed-insufficient-storage-erro 
    4. http://stackoverflow.com/questions/2239330/how-to-increase-storage-for-android-emulator-install-failed-insufficient-stora
    5. http://groups.google.com/group/android-developers/browse_thread/thread/920db96745cff96f?pli=1

    Sources: http://google-androidlovers.blogspot.com/2011/07/solution-android-installfailedinsuffici.html