Showing posts with label Android Tutorials. Show all posts

Regular Expression Example in KOTLIN - Check EMAIL address and more


Represents a compiled regular expression. Provides functions to match strings in text with a pattern, replace the found occurrences and split text around matches.

Here are some examples;


1. Check Email address valid or not (using matches )

println(".....email pattern check....")
val emails = listOf("abc_d@gmail.com", "test!@hotmail.com","abc_d@mailcom",
"343434ffsdkfs#mail", "p6060606@gmail.com","_testmaail$@last.com")

val emailPattern = "[a-zA-Z0-9._-]+@[a-zA-Z0-9-]+\\.[a-zA-Z.]{2,18}".toRegex()

emails.forEach { email ->
if (emailPattern.matches(email)) {
println("$email matches")
} else {
println("$email does not match")
}
}

output:

/* .....email pattern check....
abc_d@gmail.com matches
test!@hotmail.com does not match
abc_d@mailcom does not match
343434ffsdkfs#mail does not match
p6060606@gmail.com matches
_testmaail$@last.com does not match
*/

2.  Find the exact substring(partially word) inside the words in list

 - containsMatchIn

matches

val testWords = listOf("test", "testified", "testing", "techtest",
"exam","labtest", "roadtest", "protest", "tstom", "testimonials")

val pattern = "test".toRegex()

println("*********particular sub string inside the string************")
println("containsMatchIn function")

testWords.forEach{ word ->
if(pattern.containsMatchIn(word)){
println("$word matches")
}else{
println("$word not matches")
}
}


println("********* exact string to another string ************")
println("matches function")

testWords.forEach { word ->
if (pattern.matches(word)) {
println("$word matches")
}else{
println("$word not matches")
}
}

output

/**********particular sub string inside the string************
containsMatchIn function
test matches
testified matches
testing matches
techtest matches
exam not matches
labtest matches
roadtest matches
protest matches
tstom not matches
testimonials matches
********* exact string to another string ************
matches function
test matches
testified not matches
testing not matches
techtest not matches
exam not matches
labtest not matches
roadtest not matches
protest not matches
tstom not matches
testimonials not matches */

3. Find only only from the string or sentence - findAll

findAll
println("....find only numbers.....")
val findNumInText = "Use numerals, however, when the number modifies a unit of measure, time, proportion, etc.: 2 inches, 5-minute delay, 65 mph, 23 years old, page 23, 2 percent. "

val patternN = "\\d+".toRegex()
val founds = patternN.findAll(findNumInText)

founds.forEach { num ->
val foundValue = num.value
println(foundValue)
}

output

/*....find only numbers.....
2
5
65
23
23
2*/

4. Find particular word and its indices in sentence 

println("...Find particular word and its indices in sentence...using\\\\b operator......")
val sent = "But you never know now do you now do you now do you."
val patternIs = "\\byou\\b".toRegex()
val matchesIS = patternIs.findAll(sent)
matchesIS.forEach { word ->
val value = word.value
val index = word.range
println("$value found at indexes: $index")
}

output:

/* ...Find particular word and its indices in sentence...using\\b operator......
you found at indexes: 4..6
you found at indexes: 26..28
you found at indexes: 37..39
you found at indexes: 48..50
*/


If you want know more about regex, please check out this: 

https://kotlinlang.org/api/latest/jvm/stdlib/kotlin.text/-regex/

https://docs.oracle.com/javase/8/docs/api/java/util/regex/Pattern.html


Oreo: Auto-sizing Textview in Android Studio using Kotlin


Android 8.0 (API level 26) allows you to instruct a TextView to let the text size expand or contract automatically to fill its layout based on the TextView's characteristics and boundaries. This setting makes it easier to optimize the text size on different screens with dynamic content.

First important part to enable auto sizing textview, put this in textview:

android:autoSizeTextType="uniform"

This can explore the vertically and horizontally, ignoring text size.

If you are using support library make sure you have to use:

xmlns:app="http://schemas.android.com/apk/res-auto"

You can not use wrap content both layout height and width, because that may produce unexpected result, instead match parent or fix size. 

You can use either framework or support library to set up the autosizing of TextView programmatically or in XML. To set the XML attributes, you can also use the Properties window in Android Studio.
There are three ways you can set up the autosizing of TextView:


Note: If you set autosizing in an XML file, it is not recommended to use the value "wrap_content" for the layout_width or layout_height attributes of a TextView. It may produce unexpected results.

Now, if you are using from xml, the do following :


If you want make from programmatically then do this:


Here are array inside the values/arrays.xml, please make sure name should be same as in textview properties.


Here is the simple output that looking like:
Clone/Download/Fork/Star Full Source Code From github

Source:  Developer.android.com
#ILoveKotlin #PrAndroid #KotlinTutorials #AndroidTutorials

Alert Dialog box in android using Kotlin


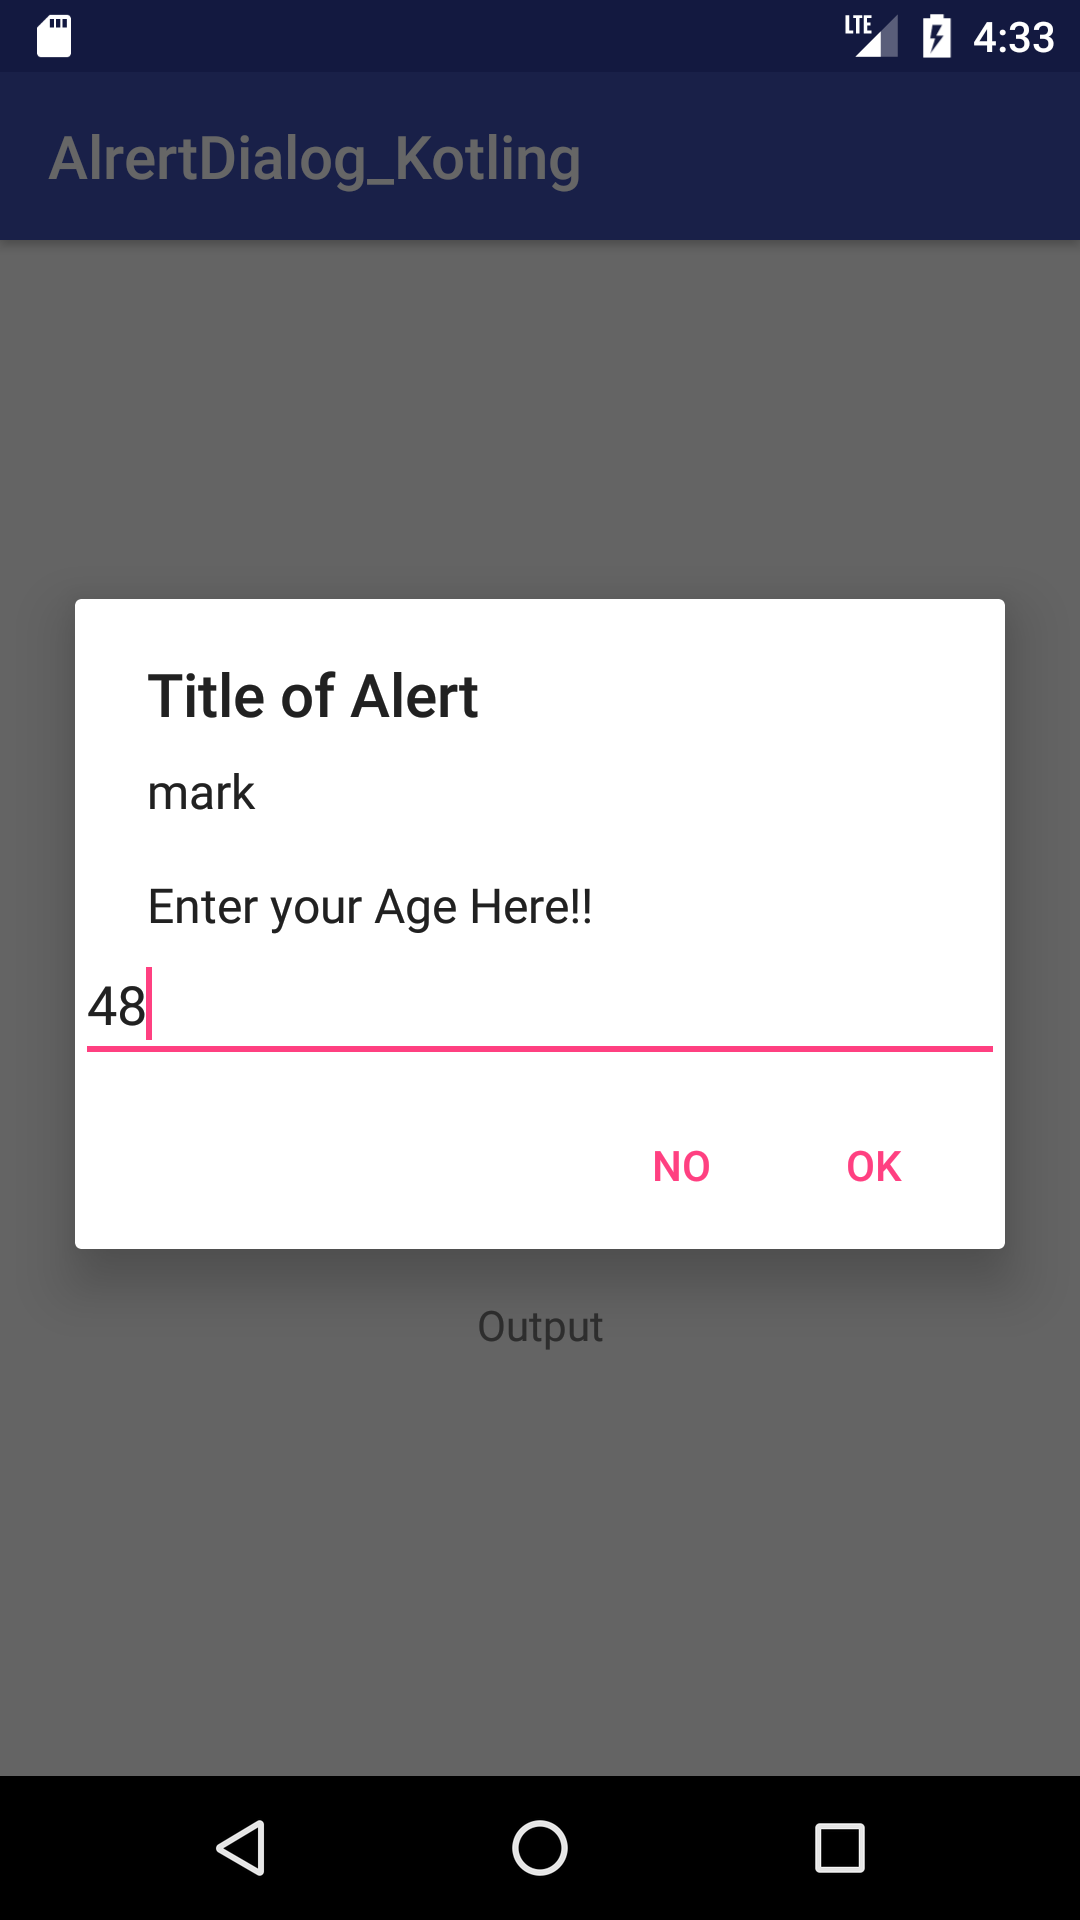
A subclass of Dialog that can display one, two or three buttons. If you only want to display a String in this dialog box, use the setMessage() method.  Most frequently using part is creating alert dialog box during application development. Here we are going to develop alert dialog using kotlin.


Here is simle kotlin code:


and output looks like:


I hope you are enjoying simple code than java for making alert dialog box with take and give inputs.

full code: https://goo.gl/rJLyc7

#HappyCoding #ILoveKotlin #PrAndroid

Solution: “Type inference failed” error by using "findViewById” in Kotlin

If you get any error when you are using kotlin and references views to kotlin, then most of time every developer faced  “Type inference failed” error  in Kotlin.

We have few option for such kind of error in kotlin,


var tvName = findViewById(R.id.txtName) as TextView

to
 
var tvName = findViewById<TextView>(R.id.txtName) 

You can use Kotlin Android Extensions too for that. Check the doc here.

Kotlin Android Extensions:

  • In your app gradle.build add apply plugin: 'kotlin-android-extensions'
  • In your class add import for import kotlinx.android.synthetic.main.<layout>.* where <layout> is the filename of your layout. for example activity_main
  • That's it, you can call TextView directly in your code.
Sometimes its works like this:

var tvName:TextView = findViewById(R.id.txtName) as TextView
If you are using Anko, then you have to do this:

var tvName:TextView = find(R.id.txtName)
Where bind internally work like this:

fun <T : View> Activity.bind(@IdRes res : Int) : T {
    @Suppress("UNCHECKED_CAST")
    return findViewById(res) as T}
More info:
https://kotlinlang.org/docs/tutorials/android-plugin.html
https://blog.jetbrains.com/kotlin/2015/04/announcing-anko-for-android/
https://developer.android.com/sdk/api_diff/26/changes.html
#HappyCoding #ILoveKotlin #PrAndroid

Splash screen in android using KOTLIN

Splash screen in android using kotlin just like java. Thread in java is same as kotlin, we have to make

 thread run certain time and go to next activity( or main activity) .

SpashScreen.Kt


You have to make your own layout as your requirement in activity_splash.xml.

It work just like java splash screen, it will be automatically redirect to MainActivity after 5 second.

#HappyCoding #ILoveKotlin #PrAndroid


How to get different way of alphabetical letter in Kotlin

Using collection in kotlin is very easy to loop over the list. Here I am presenting way of getting alphabetically letter from A to Z in different way in kotlin.


Following output above code:
Print A to Z
ABCDEFGHIJKLMNOPQRSTUVWXYZ
-------------------------
ABCDEFGHIJKLMNOPQRSTUVWXYZ
Print A to Z using With
-------------------------
Print A to Z using expression
ABCDEFGHIJKLMNOPQRSTUVWXYZ
-------------------------
print A to Z using apply
ABCDEFGHIJKLMNOPQRSTUVWXYZ
-------------------------
Print using buildString
ABCDEFGHIJKLMNOPQRSTUVWXYZ

 Happy Coding

#HappyCoding #ILoveKotlin #Android #KotlinLang #AndroidStudio

Firebase: Save, Delete and Retrieve data from firebase database in Android Studio

In Firebase Realtime Database we can store and sync data with our NoSQL cloud database. Data is synced across all clients in realtime, and remains available when your app goes offline.

The Firebase Realtime Database is a cloud-hosted database. Data is stored as JSON and synchronized in realtime to every connected client. When you build cross-platform apps with our iOS, Android, and JavaScript SDKs, all of your clients share one Realtime Database instance and automatically receive updates with the newest data.

Android Setup

Here is the one example how to store on firebase and retrieve data on your android device.

First step Create firebase project  from https://console.firebase.google.com.

Add the dependency for Firebase Realtime Database to your app-level build.gradle file:


Update the rules for your database to allow reads and writes from all users, as this demo will not cover Firebase Authentication.


Steps:
1. Create firebase database reference
2. Get data from your form
3. Add and push data on database
4. Update on your view using creating anonymous inner class ChildEventListener.
5. Check you firebase database

Here is the full code:


Update on recyclerview, which show in below git hub link.

Output Snapshots:


Clone the github java
$git clone https://github.com/dharmakshetri/FirebaseAddOrDeleteonDatabase.git

Happy Coding !!!


RxAndroid Example to display data on RecyclerView in Android Studio

RxAndroid is simple in one term is reactive extension for android.
Android authorities defined, Observables and Observers in terms of RxAndrod, There are two basic and very important items in reactive programming, Observables and Observers. Observables publish values, while Observers subscribe to Observables, watching them and reacting when an Observable publishes a value.

In simpler terms:

    An Observable performs some action, and publishes the result.
    An Observer waits and watches the Observable, and reacts whenever the Observable publishes results.

There are three different changes that can occur on an Observable that the Observer reacts to. These are:


  1.     Publishing a value
  2.     Throwing an error
  3.     Completed publishing all values


A class that implements the Observer interface must provide methods for each of the three changes above:


  1.     An onNext() method that the Observable calls whenever it wishes to publish a new value
  2.     An onError() method that’s called exactly once, when an error occurs on the Observable.
  3.     An onCompleted() method that’s called exactly once, when the Observable completes execution.

Example: Display list of data using RxAndroid in to RecyclerView

First you have to import the dependencies  latest version of RxAndrod, RxJava and other like recyclerview, in to the build.gradle on app level inside the dependencies section.


Layout:
 RecyclerView is simply A flexible view for providing a limited window into a large data set.
activity_main.xml


and custom list item layout


Now, Obserable implement on MainActivity,


and Now implement RecyclerView Adapter


Output looks like:


Download full code from github: RxAndroid_RecyclerView_Example

Happy Coding!!!


Firebase Tutorial 2: Login in Android Application using Email and Password

Firebase is the a powerful platform for building iOS, Android, and web-based apps, offering real-time data storage and synchronization, user authentication, and more.

In this tutorials, we can learn how to login android application using firebase cloud platform. After develop the application, first we have to know how to configure android application in firebase, which is the basic thing of any android application start using fire. please read the above link.


To add Firebase to your app you'll need a Firebase project and a Firebase configuration file for your app.

  1. Create a Firebase project in the Firebase console, if you don't already have one. If you already have an existing Google project associated with your mobile app, click Import Google Project. Otherwise, click Create New Project.
  2. Click Add Firebase to your Android app and follow the setup steps. If you're importing an existing Google project, this may happen automatically and you can just download the config file.
  3. When prompted, enter your app's package name. It's important to enter the package name your app is using; this can only be set when you add an app to your Firebase project.
  4. At the end, you'll download a google-services.json file. You can download this file again at any time.
  5. If you haven't done so already, copy this into your project's module folder, typically app/.
Then, in your module Gradle file (usually the app/build.gradle), add the authentication library in dependencies section.

com.google.firebase:firebase-auth:9.8.0

Now, In firebase, we know, there are many way to gives the user authentication like email/password, google, facebook, twitter, github and anonymous.

Lets start how to sign in using email/password.

After setting all the dependencies, you have to go project and left side there is Authentication section and go to sign-in method and enable the email/password section. Default it is disable, if you don't set the enable it won't work.


Now go to LoginActivity.java file,

Declare the FirebaseAuth and AuthStateListener objects. 

private FirebaseAuth mAuth; 
private FirebaseAuth.AuthStateListener mAuthListener;

In the onCreate() method, initialize the FirebaseAuth instance and the AuthStateListener method so you can track whenever the user signs in or out. 

mAuth = FirebaseAuth.getInstance();
firebaseAuthListener= new FirebaseAuth.AuthStateListener() {
            @Override
            public void onAuthStateChanged(@NonNull FirebaseAuth firebaseAuth) {

                FirebaseUser firebaseUser=firebaseAuth.getCurrentUser();
                if(firebaseUser!=null){
                    Log.e(TAG," onAuthStateChange: singed_in"+firebaseUser.getUid());
                }else{
                    Log.e(TAG," onAuthStateChange: singed_out");
                }
                updateUI(firebaseUser);
            }
        };

Attach the listener to your FirebaseAuth instance in the onStart() method and remove it on onStop(). 

@Override
    protected void onStart() {
        super.onStart();
        mAuth.addAuthStateListener(firebaseAuthListener);
    }

    @Override
    protected void onStop() {
        super.onStop();
        if(mAuth!=null){
            mAuth.addAuthStateListener(firebaseAuthListener);
        }
    }

For creating new user, we have to get the email and password from edittext and validates them and create new user with the createUserWithEmailAndPassword method.

// create new account
    public void createNewAccount(String email, String password){
        if(!validateForm()){
            return;
        }

        showProgressDialog();

        mAuth.createUserWithEmailAndPassword(email,password)
                .addOnCompleteListener(this, new OnCompleteListener<AuthResult>() {
                    @Override
                    public void onComplete(@NonNull Task<AuthResult> task) {

                         if(!task.isSuccessful()){
                             Toast.makeText(LoginActivity.this,"User Create Sucessuflly", Toast.LENGTH_SHORT).show();
                         }
                        hideProgressDialog();
                    }
                });


    }

For sign in existing user,  get the email and password from edittext field and validates them and signs a user in with the signInWithEmailAndPassword method.

// sign in exising user
public  void singIn(String email, String password){
        if(!validateForm()){
            return;
        }

        showProgressDialog();
        mAuth.signInWithEmailAndPassword(email, password)
                .addOnCompleteListener(this, new OnCompleteListener<AuthResult>() {
                    @Override
                    public void onComplete(@NonNull Task<AuthResult> task) {

                        if(!task.isSuccessful()){
                            Toast.makeText(LoginActivity.this,"User Login Failed", Toast.LENGTH_SHORT).show();
                            tvStatus.setText("Authentication Failed, Create New Account or Enter correct Credentials");
                        }

                        hideProgressDialog();
                    }
                });

    }

Yes, there is featues in firebase we can access the information about the signedIn user and there is a method getCurrentUser.

//geting user information
FirebaseUser user = FirebaseAuth.getInstance().getCurrentUser();
if (user != null) {
    // Name, email address.
    String name = user.getDisplayName();
  String email = user.getEmail();
}


Hope you will understand how to login using email/password. 

Please if you want more information about go to firebase doc.


Happy Coding !!!

Difference and uses of onCreate(), onCreateView() and onActivityCreated() in fragments

A Fragment is a piece of an application's user interface or behavior that can be placed in an Activity. Interaction with fragments is done through FragmentManager, which can be obtained via Activity.getFragmentManager() and Fragment.getFragmentManager().

   he core series of lifecycle methods that are called to bring a fragment up to resumed state (interacting with the user) are:
  1. onCreate(Bundle) called to do initial creation of the fragment.
  2. onCreateView(LayoutInflater, ViewGroup, Bundle) creates and returns the view hierarchy associated with the fragment.
  3. onActivityCreated(Bundle) tells the fragment that its activity has completed its own Activity.onCreate().
onCreate():

The onCreate() method in a Fragment is called after the Activity's onAttachFragment() but before that Fragment's onCreateView().
In this method, you can assign variables, get Intent extras, and anything else that doesn't involve the View hierarchy (i.e. non-graphical initialisations). This is because this method can be called when the Activity's onCreate() is not finished, and so trying to access the View hierarchy here may result in a crash.

defined syntax:
void onCreate (Bundle savedInstanceState)
Here is the some code, how to declare:
public void onCreate(Bundle savedInstanceState) {
    // ...
    if (savedInstanceState == null) {
        FragmentManager fragmentManager = getFragmentManager()
        // Or: FragmentManager fragmentManager = getSupportFragmentManager()
        FragmentTransaction fragmentTransaction = fragmentManager.beginTransaction();
        ExampleFragment fragment = new ExampleFragment();
        fragmentTransaction.add(R.id.fragment_container, fragment);
        fragmentTransaction.commit();
    }
}
This is called after onAttach(Activity) and before onCreateView(LayoutInflater, ViewGroup, Bundle), but is not called if the fragment instance is retained across Activity re-creation (see setRetainInstance(boolean)).

onCreateView():
After the onCreate() is called (in the Fragment), the Fragment's onCreateView() is called. You can assign your View variables and do any graphical initialisations. You are expected to return a View from this method, and this is the main UI view, but if your Fragment does not use any layouts or graphics, you can return null (happens by default if you don't override).

defined syntax:
View onCreateView (LayoutInflater inflater,ViewGroup container,Bundle savedInstanceState)
Here is the code, how to declare:
public class FirstFragment extends Fragment implements OnClickListener {

    @Override
    public View onCreateView(LayoutInflater inflater, ViewGroup container,
                             Bundle savedInstanceState) {
        View view = inflater.inflate(R.layout.first_fragment,
                                     container, false);

        Button nextButton = (Button) view.findViewById(R.id.button_first);
        nextButton.setOnClickListener(this);

        return view;
    }

    // ...
}

This will be called between onCreate(Bundle) and onActivityCreated(Bundle)


onActivityCreated():
As the name states, this is called after the Activity's onCreate() has completed. It is called after onCreateView(), and is mainly used for final initialisations (for example, modifying UI elements).If your view is static, then moving any code to the onActivityCreated method is not necessary. But when you - for instance, fill some lists from the adapter, then you should do it in the onActivityCreated method as well as restoring the view state when setRetainInstance used to do so.


defined syntax:
void onActivityCreated (Bundle savedInstanceState)
Here is the come code how to declare:
public class TestFragment extends Fragment
{
 @Override
 public void onActivityCreated(Bundle savedInstanceState) 
 {
  super.onActivityCreated(savedInstanceState);
  
 }
 @Override
 public View onCreateView(WebInflater inflater, ViewGroup container,
   Bundle savedInstanceState)
 {
  return inflater.inflate(R.web.fragment_web, container, false);
 }
}


This is called after onCreateView(LayoutInflater, ViewGroup, Bundle) and before onViewStateRestored(Bundle).

 This information taken from android official website: developer.android.com
 Someone ask and Farbod reply nicely on stackoverflow
 and beutiful explanation of fragment and its use in Newcircle.


 Happy Coding!!!

Android color code in xml

Here is the some listing android color code defined in xml, you must define in res/values/colors.xml

<?xml version="1.0" encoding="utf-8"?>
<resources>
 <color name="White">#FFFFFF</color>
 <color name="Ivory">#FFFFF0</color>
 <color name="LightYellow">#FFFFE0</color>
 <color name="Yellow">#FFFF00</color>
 <color name="Snow">#FFFAFA</color>
 <color name="FloralWhite">#FFFAF0</color>
 <color name="LemonChiffon">#FFFACD</color>
 <color name="Cornsilk">#FFF8DC</color>
 <color name="Seashell">#FFF5EE</color>
 <color name="LavenderBlush">#FFF0F5</color>
 <color name="PapayaWhip">#FFEFD5</color>
 <color name="BlanchedAlmond">#FFEBCD</color>
 <color name="MistyRose">#FFE4E1</color>
 <color name="Bisque">#FFE4C4</color>
 <color name="Moccasin">#FFE4B5</color>
 <color name="NavajoWhite">#FFDEAD</color>
 <color name="PeachPuff">#FFDAB9</color>
 <color name="Gold">#FFD700</color>
 <color name="Pink">#FFC0CB</color>
 <color name="LightPink">#FFB6C1</color>
 <color name="Orange">#FFA500</color>
 <color name="LightSalmon">#FFA07A</color>
 <color name="DarkOrange">#FF8C00</color>
 <color name="Coral">#FF7F50</color>
 <color name="HotPink">#FF69B4</color>
 <color name="Tomato">#FF6347</color>
 <color name="OrangeRed">#FF4500</color>
 <color name="DeepPink">#FF1493</color>
 <color name="Fuchsia">#FF00FF</color>
 <color name="Magenta">#FF00FF</color>
 <color name="Red">#FF0000</color>
 <color name="OldLace">#FDF5E6</color>
 <color name="LightGoldenrodYellow">#FAFAD2</color>
 <color name="Linen">#FAF0E6</color>
 <color name="AntiqueWhite">#FAEBD7</color>
 <color name="Salmon">#FA8072</color>
 <color name="GhostWhite">#F8F8FF</color>
 <color name="MintCream">#F5FFFA</color>
 <color name="WhiteSmoke">#F5F5F5</color>
 <color name="Beige">#F5F5DC</color>
 <color name="Wheat">#F5DEB3</color>
 <color name="SandyBrown">#F4A460</color>
 <color name="Azure">#F0FFFF</color>
 <color name="Honeydew">#F0FFF0</color>
 <color name="AliceBlue">#F0F8FF</color>
 <color name="Khaki">#F0E68C</color>
 <color name="LightCoral">#F08080</color>
 <color name="PaleGoldenrod">#EEE8AA</color>
 <color name="Violet">#EE82EE</color>
 <color name="DarkSalmon">#E9967A</color>
 <color name="Lavender">#E6E6FA</color>
 <color name="LightCyan">#E0FFFF</color>
 <color name="BurlyWood">#DEB887</color>
 <color name="Plum">#DDA0DD</color>
 <color name="Gainsboro">#DCDCDC</color>
 <color name="Crimson">#DC143C</color>
 <color name="PaleVioletRed">#DB7093</color>
 <color name="Goldenrod">#DAA520</color>
 <color name="Orchid">#DA70D6</color>
 <color name="Thistle">#D8BFD8</color>
 <color name="LightGrey">#D3D3D3</color>
 <color name="Tan">#D2B48C</color>
 <color name="Chocolate">#D2691E</color>
 <color name="Peru">#CD853F</color>
 <color name="IndianRed">#CD5C5C</color>
 <color name="MediumVioletRed">#C71585</color>
 <color name="Silver">#C0C0C0</color>
 <color name="DarkKhaki">#BDB76B</color>
 <color name="RosyBrown">#BC8F8F</color>
 <color name="MediumOrchid">#BA55D3</color>
 <color name="DarkGoldenrod">#B8860B</color>
 <color name="FireBrick">#B22222</color>
 <color name="PowderBlue">#B0E0E6</color>
 <color name="LightSteelBlue">#B0C4DE</color>
 <color name="PaleTurquoise">#AFEEEE</color>
 <color name="GreenYellow">#ADFF2F</color>
 <color name="LightBlue">#ADD8E6</color>
 <color name="DarkGray">#A9A9A9</color>
 <color name="Brown">#A52A2A</color>
 <color name="Sienna">#A0522D</color>
 <color name="YellowGreen">#9ACD32</color>
 <color name="DarkOrchid">#9932CC</color>
 <color name="PaleGreen">#98FB98</color>
 <color name="DarkViolet">#9400D3</color>
 <color name="MediumPurple">#9370DB</color>
 <color name="LightGreen">#90EE90</color>
 <color name="DarkSeaGreen">#8FBC8F</color>
 <color name="SaddleBrown">#8B4513</color>
 <color name="DarkMagenta">#8B008B</color>
 <color name="DarkRed">#8B0000</color>
 <color name="BlueViolet">#8A2BE2</color>
 <color name="LightSkyBlue">#87CEFA</color>
 <color name="SkyBlue">#87CEEB</color>
 <color name="Gray">#808080</color>
 <color name="Olive">#808000</color>
 <color name="Purple">#800080</color>
 <color name="Maroon">#800000</color>
 <color name="Aquamarine">#7FFFD4</color>
 <color name="Chartreuse">#7FFF00</color>
 <color name="LawnGreen">#7CFC00</color>
 <color name="MediumSlateBlue">#7B68EE</color>
 <color name="LightSlateGray">#778899</color>
 <color name="SlateGray">#708090</color>
 <color name="OliveDrab">#6B8E23</color>
 <color name="SlateBlue">#6A5ACD</color>
 <color name="DimGray">#696969</color>
 <color name="MediumAquamarine">#66CDAA</color>
 <color name="CornflowerBlue">#6495ED</color>
 <color name="CadetBlue">#5F9EA0</color>
 <color name="DarkOliveGreen">#556B2F</color>
 <color name="Indigo">#4B0082</color>
 <color name="MediumTurquoise">#48D1CC</color>
 <color name="DarkSlateBlue">#483D8B</color>
 <color name="SteelBlue">#4682B4</color>
 <color name="RoyalBlue">#4169E1</color>
 <color name="Turquoise">#40E0D0</color>
 <color name="MediumSeaGreen">#3CB371</color>
 <color name="LimeGreen">#32CD32</color>
 <color name="DarkSlateGray">#2F4F4F</color>
 <color name="SeaGreen">#2E8B57</color>
 <color name="ForestGreen">#228B22</color>
 <color name="LightSeaGreen">#20B2AA</color>
 <color name="DodgerBlue">#1E90FF</color>
 <color name="MidnightBlue">#191970</color>
 <color name="Aqua">#00FFFF</color>
 <color name="Cyan">#00FFFF</color>
 <color name="SpringGreen">#00FF7F</color>
 <color name="Lime">#00FF00</color>
 <color name="MediumSpringGreen">#00FA9A</color>
 <color name="DarkTurquoise">#00CED1</color>
 <color name="DeepSkyBlue">#00BFFF</color>
 <color name="DarkCyan">#008B8B</color>
 <color name="Teal">#008080</color>
 <color name="Green">#008000</color>
 <color name="DarkGreen">#006400</color>
 <color name="Blue">#0000FF</color>
 <color name="MediumBlue">#0000CD</color>
 <color name="DarkBlue">#00008B</color>
 <color name="Navy">#000080</color>
 <color name="Black">#000000</color>
</resources>


you can use simply:


int myColor = getResources().getColor(R.color.myColor);
Then, to use this color in a TextView, use the following:

myTextView.setTextColor(myColor);


In Xml
android:drawable="@color/YOUR_COLOR_HERE"
android:textColor="@color/text_color"

Source: stackoverflow

appcompat-v7:21.0.0': No resource found that matches the given name: attr 'android:actionModeShareDrawable' in Android

If you faced appcompat-v7:21.0.0': No resource found that matches the given name: attr 'android:actionModeShareDrawable' error on during developing android application.

Here is the solution in Android studio, Eclipse and  IntelliJ IDEA.

Prerequirements
Make sure that you've downloaded the latest extras as well as the Android 5.0 SDK via the SDK-Manager.
Picture of the SDK Manager


Android Studio:

Open the build.gradle file of your app-module and change your compileSdkVersion to 21. It's basically not necessary to change the targetSdkVersion SDK-Version to 21 but it's recommended since you should always target the latest android Build-Version.
In the end you gradle-file will look like this:
android {
    compileSdkVersion 21
    // ...

    defaultConfig {
        // ...
        targetSdkVersion 21
    }
}
Be sure to sync your project afterwards.
Android Studio Gradle Sync reminder


Eclipse:

The only thing you have to do is to open the project.properties file of the android-support-v7-appcompat and change the target from target=android-19 to target=android-21.
Afterwards just do a Project --> Clean... so that the changes take effect.


IntelliJ IDEA:

Right click on appcompat module --> Open Module Settings (F4) --> [Dependency Tab] Select Android API 21 Platform from the dropdown --> Apply
Select API 21 Platform
Then just rebuild the project (Build --> Rebuild Project) and you're good to go.

Sometimes , If above solution doesnot work then try this
Haven't set compileSdkVersion to 21 in your build.gradle file and change targetSdkVersion to 21.
android {
    //...
    compileSdkVersion 21

    defaultConfig {
        targetSdkVersion 21
    }
    //...
}
This requires you to have downloaded the latest SDK updates to begin with.
Android Studio SDK Manager
Once  downloaded all the updates (don't forget to also update the Android Support Library/Repository, too!) and updated your compileSdkVersion, re-sync Gradle project.
Edit: For Eclipse or general IntelliJ users


Happy Coding!!!